
How to use a piping bag and nozzle: Piping Techniques
As someone who loves making pastries, you've probably already used a piping bag and piping nozzles. These accessories soon become indispensable in any kitchen for decorating your creations or even preparing them. But do you know how to use them as effectively as possible? For example, which equipment should you choose? And which nozzle diameters are best? Are how can you be sure your piping will always work? These are just some of the questions we'll be answering with Mehdi from The French Pâtissier. Mehdi is always keen to help amateur pastry chefs improve their skills, so he is kindly sharing his invaluable advice with us.
Why should you use a piping bag and nozzles?
Piping nozzles and their bags are essential pastry-making accessories, but they can be intimidating when you're just starting out. Mehdi explains that, in short, these utensils have three separate uses.
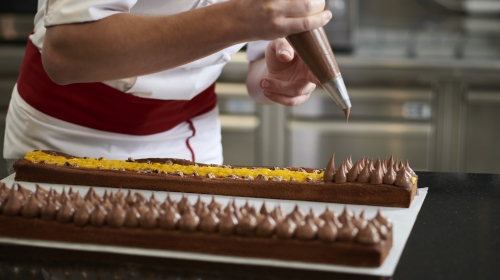
1. Decorative piping
This is the first thing we think of when we think of piping. You might pipe a decoration onto a cake. This can range from simply topping a cupcake with buttercream to the technically demanding job of piping a Saint-Honoré. Finally, you might also make some very fine decorations using chocolate or icing. These decorative techniques are also very useful for cake design.
2. Piping choux pastry
Piping offers a useful way of making very equal choux pastries and straight eclairs. The results are neat and tidy. The choux pastry will expand as it bakes, so if your choux or éclair has imperfections, they'll be even more noticeable after baking!
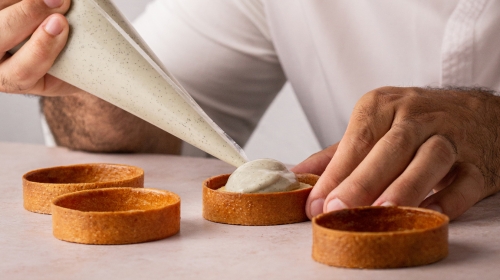
3. Filling using a piping bag
Mehdi recommends using a piping bag, rather than a spoon, to fill choux pastries, desserts and tarts. Bags offer greater precision and speed. The result is neater, more efficient and more consistent. In fact, that's what the professionals do.
What preparations can I pipe?
As we alluded to earlier, dense textures can be piped. We've talked about choux pastry, but you can even pipe sponges, for example, to make Viennese whirls.
When it comes to decoration, there's plenty to choose from. You can pipe:
- Whipped ganache
- Mascarpone whipped cream - the mascarpone is important here, as it adds fat and therefore makes the whipped cream more cohesive. If you use cream alone, it will break up and sink and your decoration won't stay stable.
- Namelaka, diplomat or mousseline cream
- Buttercream for cupcakes and traditional yule logs
Do remember that not everything is suitable for piping! Jellied custards, for example, will be hard to pipe even if they seem firm. Confits don't pipe well because they are too liquid and unstructured. Some crémeux don't hold up very well unless they include butter. Piped decorations have to be jellied or butter-rich for them to hold together. What this means is that they have to contain an ingredient that will set in the refrigerator.
It's a real challenge to create a decoration that's both attractive to look at and delicious. Traditionally, recipes have contained a lot of butter. This doesn’t always taste great, and sometimes the results can be overly rich. However, it's now possible to do without butter thanks to new techniques! For example, in his book Reasonable Indulgence, chef Frédéric Bau includes recipes for whipped ganaches made with liquid starch. They are flavorsome and hold together well, while also being fairly low in fat and sugar. Mehdi believes that a sea change is underway, with new techniques becoming available to both professionals and home cooks. Pastries in 2025 to 2030 will have nothing in common with pastries from 2015 (such as, for instance, very buttery and sweet whipped ganaches). The aim here is to make room for products that are just as beautiful and tasty, but healthier too.
How to fill a piping bag
Here are Mehdi's tips for filling your piping bag so that your kitchen doesn’t get coated with your latest preparation.
- Lock the nozzle in place. Slide the bag and nozzle together and push the bag into the nozzle so it is firm.
- Hold the piping bag so its bottom part is facing upwards. Fold it over your hand, so that if any of the mixture runs over, it will end up inside the bag and not on your work surface.
- Don't overfill the piping bag! This is the most common mistake people make. Professionals refill their bags little by little. Four or five spatulas of mix is enough. This will make your piping cleaner and more precise (and the bag will be easier to handle if it's not too big). It will also prevent your preparation from heating up for too long in your hand.
- Hold the piping bag in your hand to fill it. Your hand should form a nice wide U-shape. Scrape your pastry scraper or spatula against the edge of the hand holding the folded-over piping bag.
- If your preparation is liquid, consider using a measuring jug or glass. Put the piping bag in the jug and turn over its edges. This leaves you with both hands free to hold your mixing bowl and spatula. But be careful not to overfill it!
How to use a piping bag with a nozzle
Where to put the nozzle
One thing you mustn't do is cut off the end of your piping bag, then insert the nozzle. The chances are you've misjudged it and the nozzle won't fit properly.
To start off, keep the bag closed and insert the nozzle. You'll need to cut a hole in the bag that is one-third of the nozzle’s length (one-third should protrude from the piping bag). Nick the bag with some scissors to mark the spot, take off the nozzle and make the cut.
How to handle a piping bag and nozzle
Mehdi reiterates an important point - it’s crucial you don’t overfill your bag. Before you start piping, always try it out on a piece of paper or your work surface. This way, you can make sure you’ve got the right texture, the right flow and the right technique.

If you’re right-handed, your right hand is at the top and your left hand at the bottom. The right hand presses down on the preparation to make it come out. The hand at the bottom doesn't apply any pressure, as it will push the preparation upwards. It's just there to guide you. In fact, some people pipe with one hand and use the other to turn a turntable, for example.
Another useful tip is to get rid of any air bubbles in the piping bag by pushing them upwards. If you don’t, they might burst and splatter all over your cake - and ruin your piping!
Mehdi's tips for learning how to pipe
Practice is the key to piping. But to save time and avoid having to make, for example, a whole whipped ganache, here are a couple of tips.
- Use shaving cream to practice piping decorations. This foam feels just like a whipped ganache or cream, and has the same texture. The advantage of this is that you can reuse it and there's no waste. It’s a great way to learn to how to get the right angle and pressure and it’s ideal if you want to save money and time!
- Use mashed potatoes made with instant potato flakes to practice piping choux pastries or éclairs. Slowly add more water to the flakes to get just the right texture. As mentioned above, imperfections such as tiny air bubbles are magnified during baking and become even more noticeable. That’s why getting the technique right is so important. It’s worth remembering that choux pastry has the advantage of being easy to handle. If you make a mistake, you can scoop up what you have already piped and start again.
All about equipment: which nozzle and which piping bag should you choose?
How to select the right piping bag
Mehdi advises first and foremost that you choose a piping bag that's big enough to hold comfortably. It should be at least 40cm long.
Should you use disposable or reusable bags? Mehdi opts for disposable, but that's mainly because he uses a lot of them. The disadvantage of reusable piping bags is that they have a set diameter at the tip. This limits which nozzles you can use and the options open to you. However, they do have the advantage of being more environmentally friendly, as they use less plastic and generate less waste.
Piping bags come in different colors! Why are the bags sold as part of Valrhona Collection blue? It’s because, when you cut off the end, the little bit of plastic can fall into your preparation and it's easier to spot if it's blue. This way, you won’t have the nasty surprise of finding a piece of plastic on your plate when you’re eating.

Can you pipe without a piping bag?
If you don't have a piping bag handy, you can try using freezer bags. It can work in a pinch, but it's not really practical. The shape isn't quite right, the opening on the side makes handling harder, the bags are generally not very big and so on. In short, it can work in an emergency, but it's not the easiest thing to do.
Which nozzle to choose for each use
First of all, should you go for stainless steel or plastic nozzles? Mehdi strongly recommends stainless steel ones, as they are more professional and durable. The plastic ones have a small rim, which means that your preparation might run down the side.
Here is a list of essential pastry nozzles:
- For choux and éclairs, use a plain round 12 nozzle and a fluted nozzle (petit four-type, 14 or 16).
- Plain round nozzles: 6, 10, 12, and 16. For applying decorative touches of various sizes.
- Fluted nozzles: Petit four-type 6 or 8 and 14 or 16.
- A Saint Honoré nozzle
Bear in mind that the numbers given in the list above are the diameter (in millimeters) of the nozzle’s opening.
This list gives you a good base to work from. Once you've made your first purchase, you can add decorative nozzles to suit your taste, including flower, leaf, petal, basket weave or (for Mont Blanc desserts) vermicelli varieties. The advantage of these pastry accessories is that they last for a long time.
Do I need a turntable for piping?
Don't worry - if you don't have a turntable, they’re not absolutely essential. On the other hand, they can make your work easier.
Piping ideas for decorating your pastries
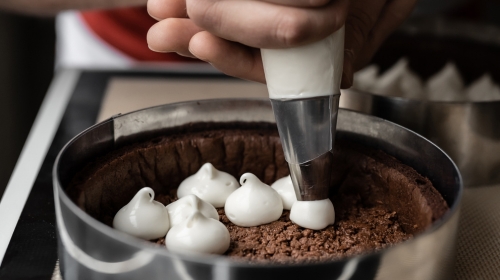
Basic piping: the classics
- Piping out rounded shapes with a slightly pointed tip is the basic technique to master before you embark on anything more complicated. Mehdi tells us to position our hand 1.5cm from the dessert. Pipe out the preparation while holding the bag vertically and completely still, then when you stop applying pressure, pull the bag directly upwards to make a pointed tip.
- A variation on the above is to tilt your piping bag.
- Saint-Honoré piping: Makes a flame shape or its zigzag variant.
On-trend piping techniques
- Flower piping, with petals: This is often used for pavlovas or tarts. You will need Wilton P125 and Wilton P104 nozzles. This technique will make you an Instagram star!
- The tourbillon (or "whirlwind"), a technique perfected by chef and Meilleur Ouvrier de France Yann Brys. Use a turntable or potter's wheel. Use a Saint-Honoré or petal nozzle and work from the inside out. This is a great technique for impressing guests!
- Round shapes with hollowed middles: Pipe out some rounded shapes, flatten them slightly, then make a hollow using a melon baller. Pour a confit or praliné, for example, into the hollows for extra indulgence.
Go to Instagram for more inspiration and follow the hashtags #piping and #pipingtechniques. You can save the piping designs that inspire you and you’d like to try yourself in your collections.
Many thanks to Mehdi for sharing his skills and advice. Check out the Valrhona Collection blog for more articles on techniques to help you improve your pastry skills.